This article can also be read as an html file, in a more readable form with the text on the side of the diagrams. Click HERE
to get the web page.
I would like to thank Paul Stephens and GreenLantern for their invaluable help analyzing my approach and showing me how to present it on the forum.
Kit
The general concept is to label pairs of candidate numbers which appear only twice in a row, column, or box with letter pairs: AB, CD, EF, etc. Similarly, if a cell has only two candidates these candidates can be labeled with the letter pairs. The labeling for a given letter pair can continue as far as possible, branching out to other rows, columns, or boxes. For a given letter pair, either all candidates labeled with the first letter are true and all candidates labeled with the second letter are false, or vice versa. The intertwining of these labeled candidates will produce conclusions which otherwise are not immediately obvious.
Notation:
-> means implies
~A means A is false
~AC means that both A and C being true is not the case
AvC means that either A or C (maybe both) is the case
A iff C means A if and only if C
Here are some of the simple inferences which often occur:
1) By the way the labeling is constructed, for letter pairs we have ~AB and AvB (thus A or B is true, but not both).
2) If two labeled candidates of the same number are in the same row, column, or box then these two labels cannot both be true. Similarly if two labeled candidates are in the same cell, then these two labels cannot both be true. For example, if we have in a given cell:
AC
567
Then we know that ~AC.
3) If we have ~AC and ~BE, it follows that ~CE. Proof: C -> ~A -> B -> ~E
4) If we have only two labeled candidates of the same number in a given row, column, or box, or only two labeled candidates in a given cell, then these labels must be letter pairs. For example:
AC
56
If the cell contains only these candidates, then C = B, D = A, and we can replace all C’s and D’s with B and A respectively.
5) If we determine that ~AC and ~BD, we can conclude that D = A, C = B, and can replace all C’s and D’s with B and A respectively. Proof: C -> ~A -> B. ~C -> D -> ~B. Hence C iff B, so they are equivalent.
6) If we determine that ~AC and ~BC, we can conclude that ~C, therefore D. So all D’s are true, and all C’s are false. This is of course the nicest conclusion to find.
7) If a candidate can “see” both members of a lettered pair (i.e. is the same number in a row, column, or box or exists in the same cell), then that candidate can be eliminated. For example:
A
678
B
567
Assuming these two cells are in the same row, column, or box, we can eliminate the 6 in the lower cell. If it were true then neither A nor B would be true, which is impossible. This is the most common candidate elimination which occurs with this technique.
8) Suppose we have determined that ~AC. Therefore, BvD. So any candidate which can “see” both a B and a D can be eliminated.
9) If we have two labeled candidates which can “see” the members of a cell with only two candidates, then both of these labels can’t be true. For example:
A
456
47
C
789
If the 456 cell and the 789 cell can both see the 47 cell, then ~AC, since otherwise it would be impossible to have an entry in the 47 cell.
The above simple inferences are sufficient to make most deductions.
In the following puzzle, I illustrate step by step the deductions I made from the labeling. For each diagram, I describe what changes I am about to make in the puzzle and why. I have made no attempt to clean up this solution. These are the steps that I actually took to solve the puzzle, in the order in which I found things. Thus, there will be some steps which will not be necessary for the solution.
It should be noted that this labeling is not necessary. Any of the conclusions I draw can be made from appropriate inference chains or other advanced techniques. However, the labeling makes it unnecessary to find these long chains.
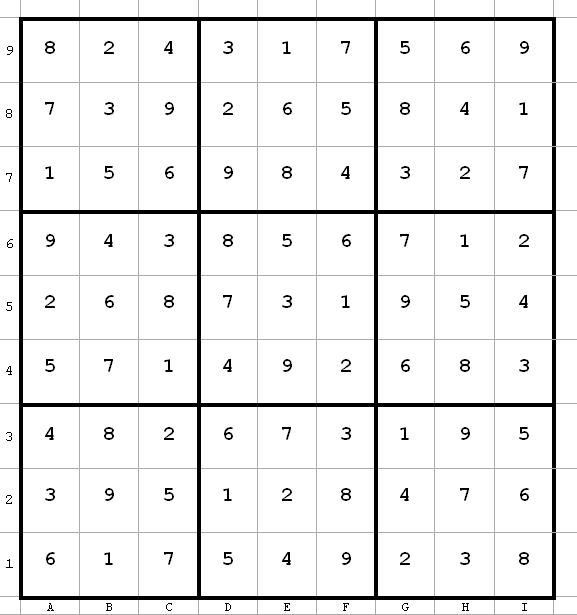
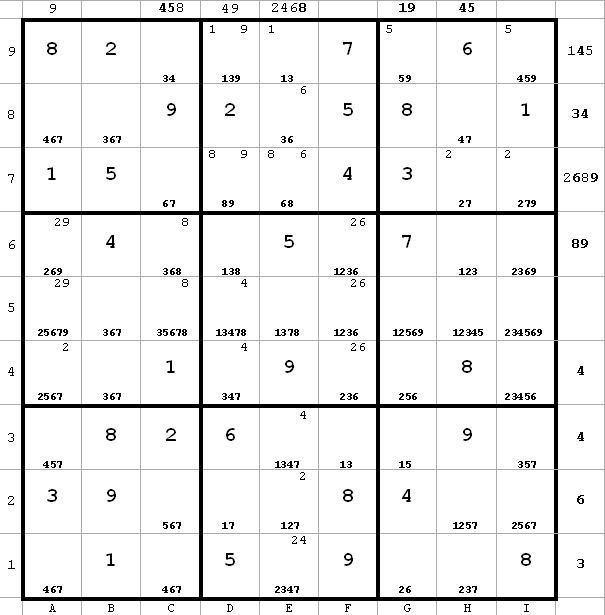
Diagram 1
This is problem 1426 from Paul’s pages.
Toughness rating: 1846
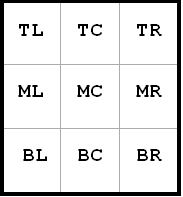
Notation: Columns are labeled a to i. Rows are labeled 1 to 9. Cells are a letter and a number, e.g. c8 stands for the cell in column c and row 8. Boxes are denoted TMB (top, middle bottom) and LCR (left, center, right) as below:
C8(3) means the candidate 3 in c8
c8 = 3 means that 3 is in cell c8
c8 <> 3 means that c8 does not contain the number 3
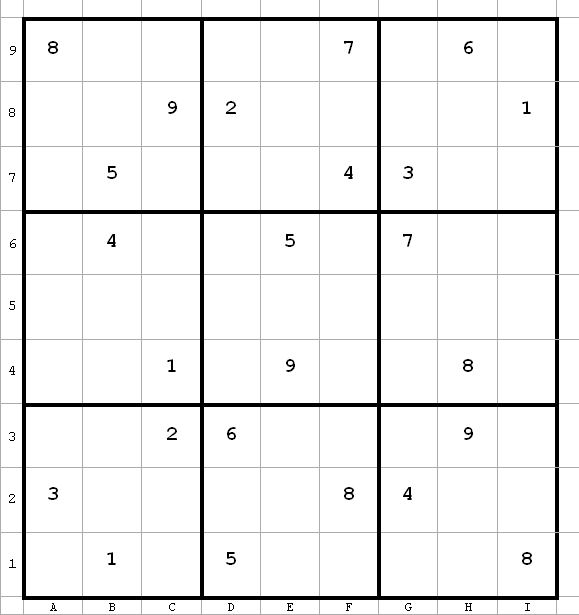
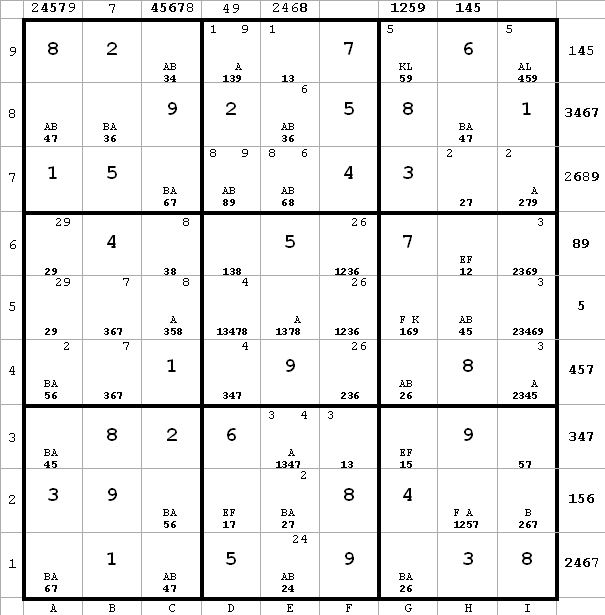
Diagram 2
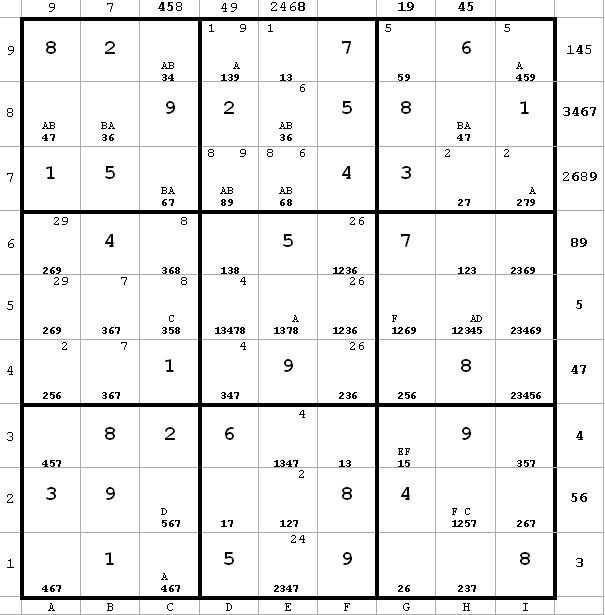
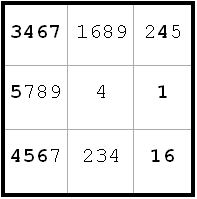
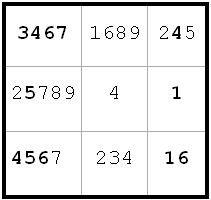
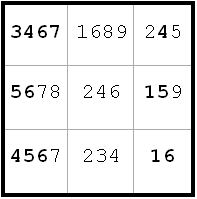
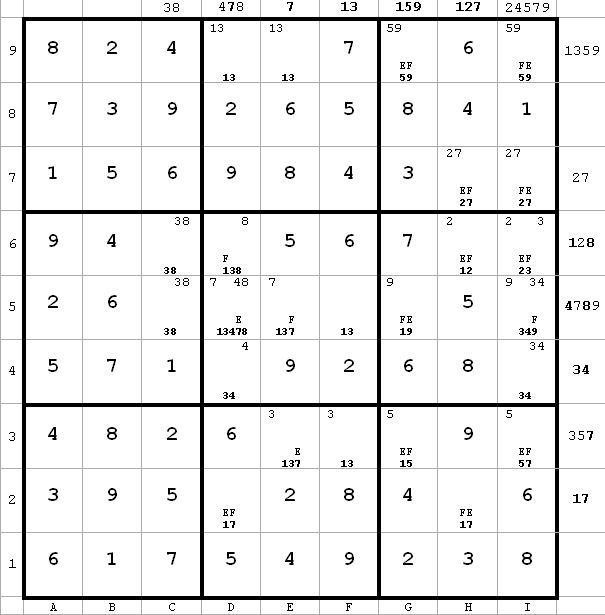
Here is the board after the usual preliminary work. I list the candidates at the bottom of the cell. In addition, if a particular candidate can appear in a cell only in one row or one column, I designate that by putting the candidate in the upper left corner of the possible cells if they are in one row, or in the upper right corner of the possible cells if they are in one column.
For example, look at the candidate 1 in the TC box. 1 can appear only in d9 or e9. So in these two cells, I put a 1 in the upper left corner.
Similarly, in the same box 9 can appear only in d9 or d7. In these two cells, I put a 9 in the upper right corner.
I find this helps me see patterns later on.
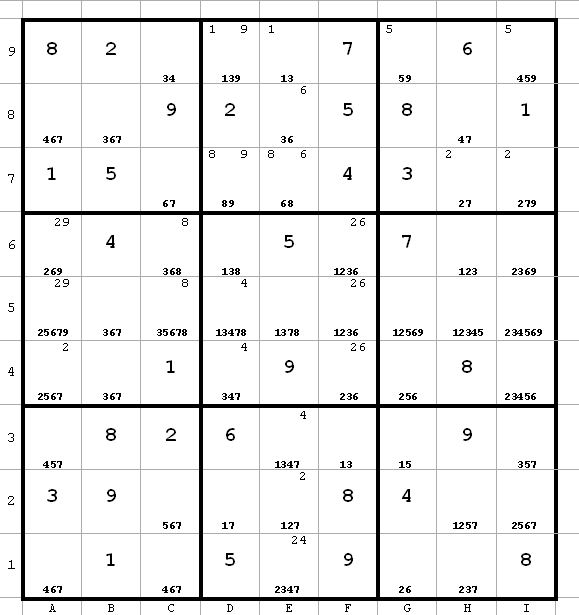
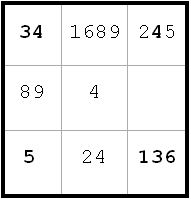
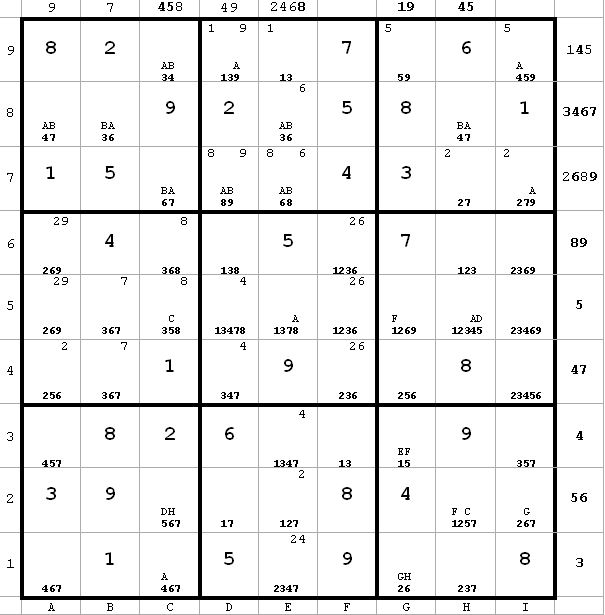
Diagram 3
In addition, I list on top of each column every candidate which appears only twice in that column, and on the right of each row every candidate which appears only twice in that row. I do the same for each box as illustrated below. The candidates which are in boldface are those which are paired only in that row, column, or box. These turn out to be more valuable, since they let me jump around more.

Doing this helps in several ways.
1) It may pick up any errors which I have made.
2) I may find last minute naked singles, pairs, or triplets which I had overlooked.
3) It helps me judge which candidates to label.
4) It cuts down on labeling mistakes.
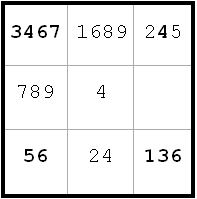
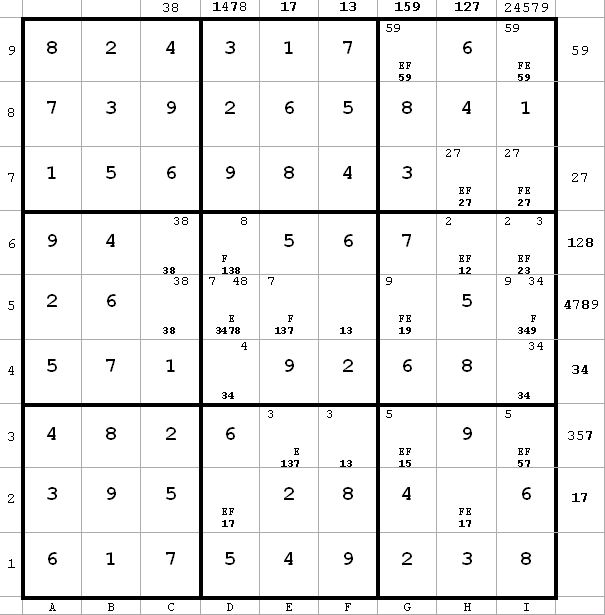
Diagram 4
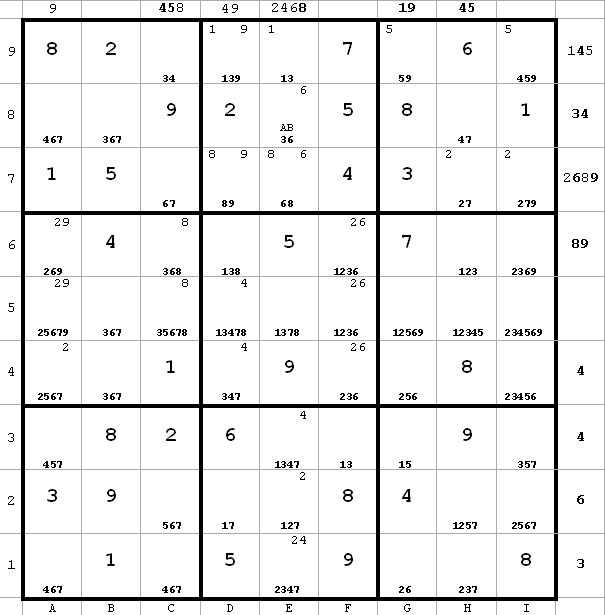
Now I start my labeling. The idea is to label candidates which either are all true or all false with the same letter, say A, and to label corresponding candidates B which will be true iff A is false. I use pairs of letter to denote this – AB, CD, EF and so on.
I try to choose my labeling to branch out to the most candidates possible.
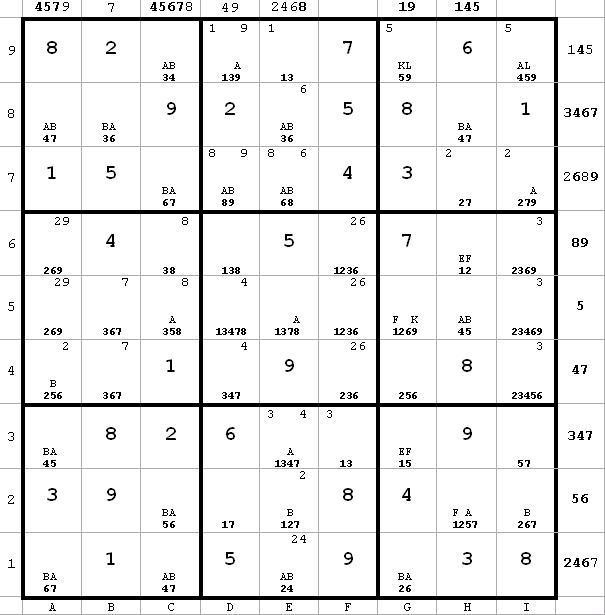
For this puzzle, I choose to start with:
A: e8(3)
B: e8(6)
I can then continue labeling A’s and B’s as long as I can find pairs. For example, since there are only two 6’s in the e-column, I can label e7(6) = A. And then since there are only two candidates in e7, I can label e7(8) = B.
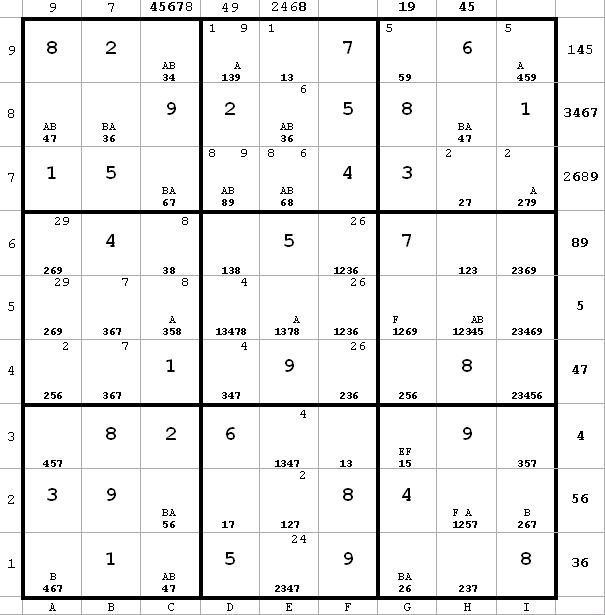
Diagram 5
I have completed the AB labeling as far as I can go. Now look at b8. b8(3) = B and b8(6) = A. Since A or B is true, it is clear that I can eliminate b8(7).
The logic chain would be as follows: b8 = 7 -> e8 = 3 -> e7 = 6 -> c7 = 7 -> b8 <> 7
By similar reasoning, since b8(6) = A and e8(6) = B, a8(6) can be eliminated.
The beauty of this approach is that it isn’t necessary to recognize these patterns or to follow the inference chains. Simply seeing the AB in b8 immediately tells us that b8(7) can be eliminated.
In the next diagram I eliminate b8(7) and a8(6), which allows me to do more labeling. E.g. a8(7) = B, since there are now only two 7’s in the 8-row and h8(7) = A.
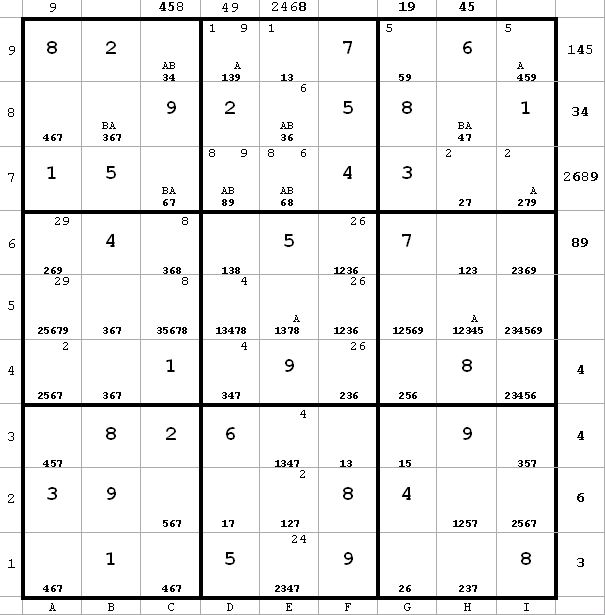
Diagram 6
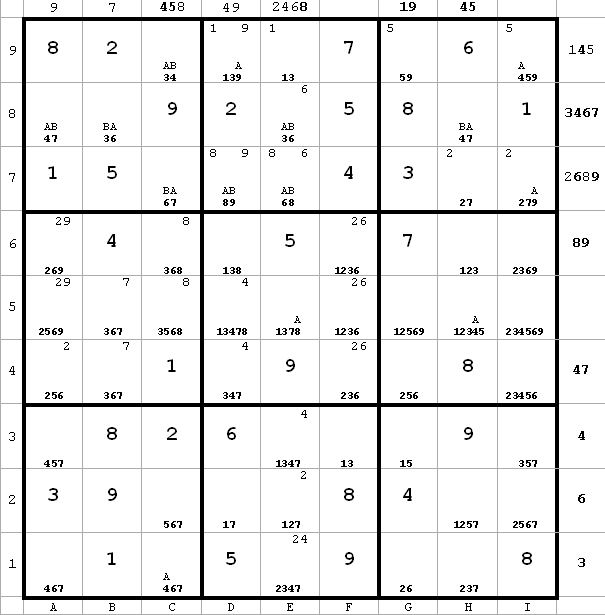
In addition to the elimination and further labeling, I try to keep my bookkeeping of pairings up-to-date. For example, now there are 7’s only in b4 or b5 on the b-column. Hence I put 7’s in the upper right corner of these cells, and can thus eliminate any other 7’s in the ML box.
At this point I happened to notice that the 5’s in c2, c5, h2, and h5 form an x-wing, so I can eliminate all other 5’s in the 2-row and 5-row. But if I hadn’t noticed this, or even if I had never heard of an x-wing, my approach would have caught this as soon as I labeled these. Let’s say I label c5(5) = C and c2(5) = D (which I will, in fact). C -> h5 <> 5 and D -> h2 <> 5 -> h5 = 5. Thus h5(5) = D and h2(5) = C. For example i5 <> 5 from c5(5) = C and h5(5) = D.
Diagram 7
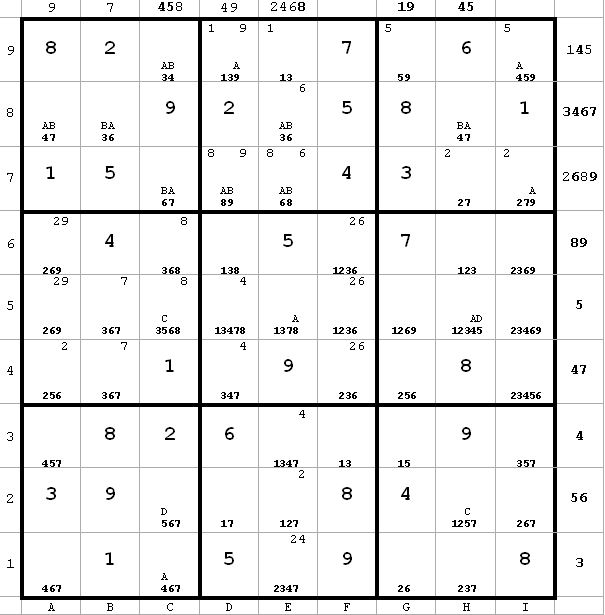
 ~AD
~ADFrom h5 I have the important piece of information that ~AD. Therefore, we must have BvC. Consequently, any candidate which can see both a B and a C can be eliminated. In this case I can eliminate c5(6) since it can see c5(5) = C and c7(6) = B.
The logic chain is easy to follow with the labeling. c5 = 6 -> c5 <> 5 -> h5 = 5 -> h5 <> 4 -> h8 = 4 -> a8 = 7 -> c7 = 6 -> c5 <> 6.
This chain wouldn’t be immediately apparent, at least not to me. But I don’t need to spot the chain. Simply noticing that c5(6) can see both B and C is all I need.
I now choose to label
g3(1) = E
g3(5) = F
Next diagram
Diagram 8
 ~AD ~AF ~CF
From h2 I immediately have ~CF. And since ~AD, it follows that ~AF. The reasoning is as follows:
A -> ~D -> C -> ~F therefore ~AF.
This logical inference comes up all the time with this approach.
I now choose to label
g1(2) = G
g1(6) = H
Next diagram
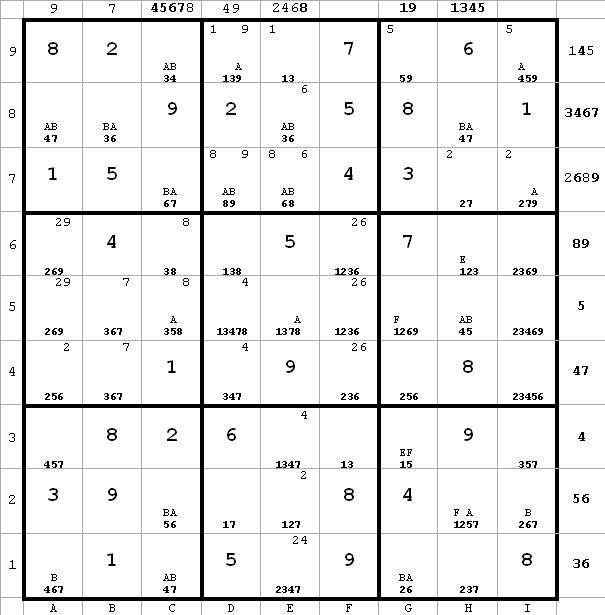
Diagram 9
 ~AD ~AF ~CF ~DH ~FH ~BH
~DH from c2. Since ~CF, therefore ~FH.
~BH from c7(6) and c2(6).
A -> c7 = 7 -> c2 <> 7
A -> c2 <> 5 since ~AD
Therefore, A -> c2 = 6, so ~AG
Since ~AG and ~BH, it follows that G = B and H = A. (next diagram)
I didn’t really have to label GH to get to this conclusion. The key is that ~AD. So B -> c2 <> 6 and A -> c2 = 6, which means I can label c2(6) = A and the rest of the labeling would follow.
Diagram 10

 ~AD ~AF ~CF
c1 <> 6 from c2(6) and c7(6).
Thus, I can label c1(7) = B.
Also, c6 <> 6 by same reasoning
(next diagram)
Diagram 11
 ~AD ~AF ~CF
Now I have that c2 <> 7 from c1(7) and c7(7). That leaves only 2 entries in c2. Since these are labeled D and A, it follows that D = B and therefore C = A. I can thus replace all C’s and D’s with A and B respectively (next diagram).
Diagram 12
 ~AF
~AFFrom h5(4) and h5(5), I can eliminate h5(1), h5(2), and h5(3). That lets me label h6(1) = E (next diagram).
Diagram 13
 ~AF
~AFI now choose to label
h6(3) = I
h1(3) = J
Next diagram
Diagram 14

 ~AF ~EI ~AI
~EI from h6.
Since ~AF, it follows that ~AI.
Since ~AI, BvJ. Therefore h1 <> 2, since it can see both B and J in g1(2) and h1(3) respectively.
This sort of relationship is very easy to spot. As soon as ~AI is determined, a quick check of the B’s and J’s will find any candidate which can see both letters and can thus be eliminated. The chain which proves this is probably pretty long, but I don’t have to worry about it.
This elimination of h1(2) and appropriate labeling is reflected in the next diagram
Diagram 15

 ~AF ~EI ~AI
a1 <> 4 from a1(6) and c1(4). Obviously I could have done this a while ago had I seen it. This will label a1(7) = A, since only two candidates remain in a1. That eliminates e1(7) and h1(7) due to a1(7) = A and c1(7) = B. Also, a3(7) is eliminated due to a1(7) = A and a8(7) = B Since h1 <> 7, I is false and J is true. All this new information is reflected in the next diagram.
Diagram 16
 ~AF ~AL ~FK
I choose to label
g9(5) = K
g9(9) = L
~AL from i9
~FK from g5
Since ~AL, BvK, therefore g5 <> 2 from g5(9) and g1(2). This allows me to label g4(2) = A (next diagram)
Diagram 17

 ~AF ~AL ~FK
Now a4 <> 2 from a4(5) and g4(2). That means that (a5a6) = (29), a naked pair, so 6 can be eliminated from a5 and a6 (next diagram).
Note that this deduction could also have been made from a4(6) = A after a4(2) is eliminated, since a1(6) = B.
Diagram 18
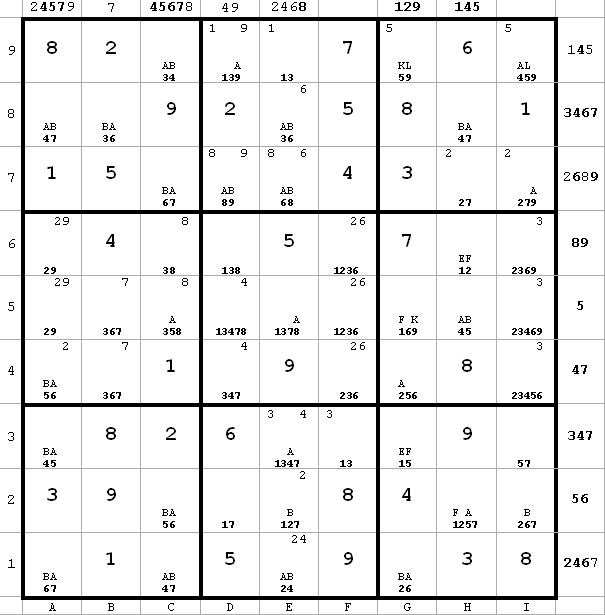
 ~AF ~AL ~FK
Look at the e-column.
A -> e5 <> 7 from e5(8)
A -> e3 <> 7 from e3(4)
Therefore, A -> e2 = 7 since that is the only 7 remaining on the e-column. Since B-> e2 <> 7 from e2(2), I can label e2(7) = A, thus eliminating e2(1). The results of this elimination are reflected in the next diagram
Diagram 19
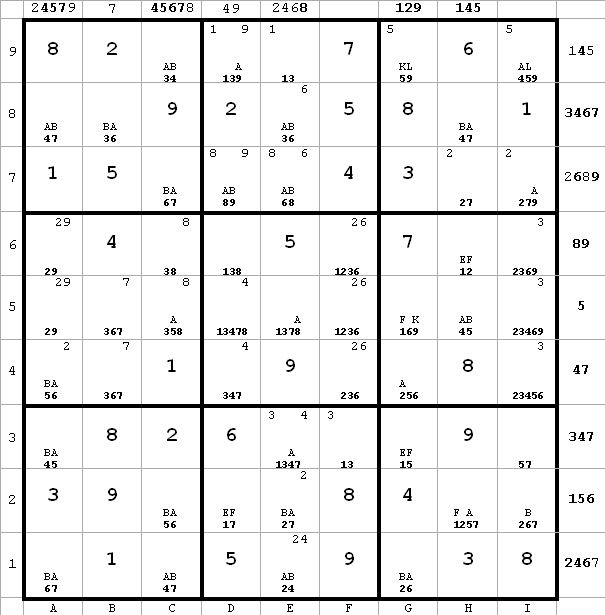
 ~AF ~AL ~FK
i4 <> 6 from a4(6) and i2(6).
g4 <> 5 from a4(5) and g4(2).
Next diagram
Diagram 20
 ~AF ~AL ~FK
Since g3(5) and g9(5) are the only 5’s in the g-column, it must be that K = E and L = F.
f4 <> 6 and b4 <> 6 from a4(6) and g4(6)
g5 <> 6 from g1(6) and g4(6)
Next diagram reflects this new information
Diagram 21

 ~AF
~AFF -> h6 = 2 -> a6 = 9 -> i6 <> 9
E -> g5 = 9 -> i6 <> 9
Therefore, i6 <> 9.
Astute readers will note that this is a classic xy-wing. But I never had to recognize it as such.
So a6 = 9 since only 9 left in 6-row, and a5 = 2. Results in next diagram
Diagram 22

 ~AF
~AFi2 <> 7 from e2(7) and i2(6). Results of this in next diagram
Diagram 23
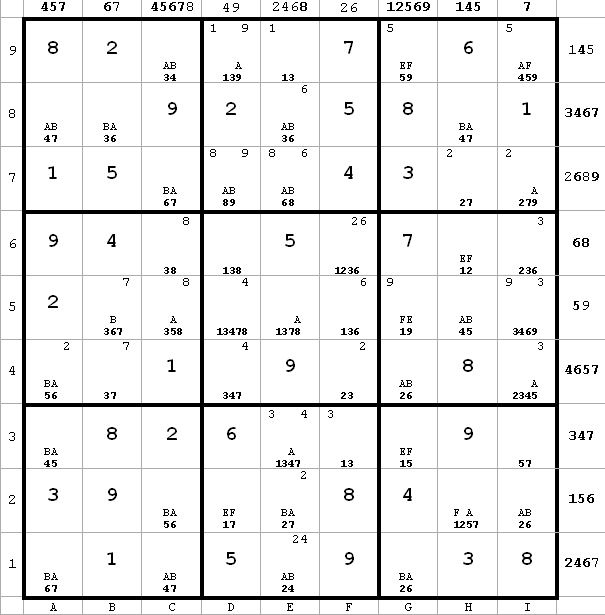
 ~AF
~AFh2 <> 2 from e2(2) and i2(2). So h7(2) = E, since only two 2’s left in h-column and h7(7) = F. Results next diagram
Diagram 24
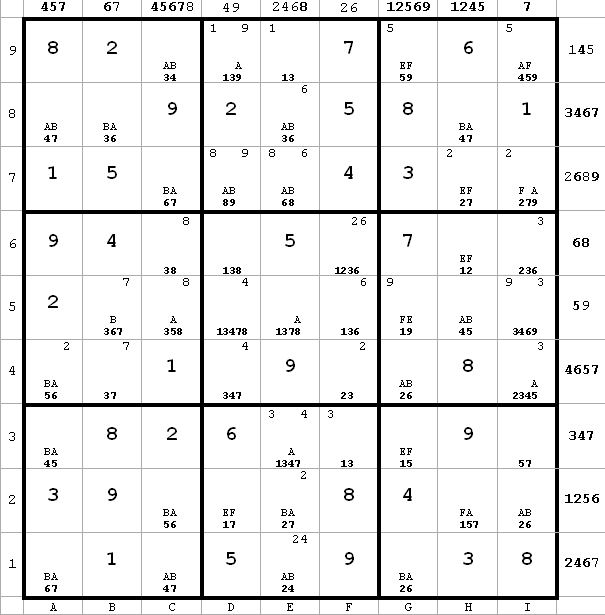
 ~AF
~AFA -> e3 = 4 -> e3 <> 3 -> f3 = 3 -> f4 = 2 -> g4 <> 2 –> ~A, which is a contradiction. Hence, A must be false, and B true. This lets me fill in a lot of cells. Results next diagram.
Diagram 25
d5 <> 1 from d2(1) and d6(1)
Also d9 <> 1 for same reason, so d9 = 3 and e9 = 1
Next diagram
Diagram 26
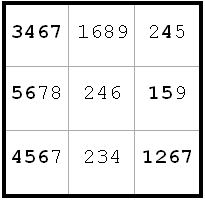
From d9 I have d4 = 4 -> i4 = 3 -> i6 <> 3. So F is false, E is true, and from this the puzzle can be solved by straightforward means (next diagram)
Diagram 27